
This tutorial will cover the following:
- What is a DAW?
- How to choose a DAW
- Iphone: Garageband
- Android: BandLab
- Advanced option: Cubase
- Comping
- Compressor
- EQ
- Reverb/Delay
- Gate
- DeEsser
- Saturation
- Auto-tune/Melodyne
- Panning
- Stems and harmonies
What is a DAW?
To mix your vocals you need a DAW.

The Digital Audio Workstation is a mixer board in your computer or your smartphone. As in a mixer board all instruments or vocals are on their own tracks in a DAW and can be edited individually. This is the basis for mixing a song or vocals that you want to send to a producer.
Audio and Midi
In the DAW you can either have audio or midi. Audio is recorded vocals and real instruments like guitars, basses and drums. Midi is different instruments that are programmed by the engineer or producer. To a listener they can sound the same. Midi is sometimes called instruments, but it should not be confused with real instruments.
How to choose a DAW
Which is best? It’s easy to answer. Choose a DAW you like! The best DAW is the one you like and know the best. Most DAW:s work in the same way. You have one track for each instrument, and you can edit them individually with the level and effects you want to have. Most DAW:s are not free but some are. Some work both on a Mac and on Windows and some only in one of them. A few works on your smartphone or pad.
I will describe two easy ones (Garageband and Bandlab) and one advanced (Cubase).
Iphone: Garageband
On your Iphone use Garageband. It has a has a lot of presets so you don’t have to be a mix engineer to record and mix professional vocals. See my tutorial on Garageband decribing how to record the vocals with Garageband.
For editing the vocals do the following.
- Press settings
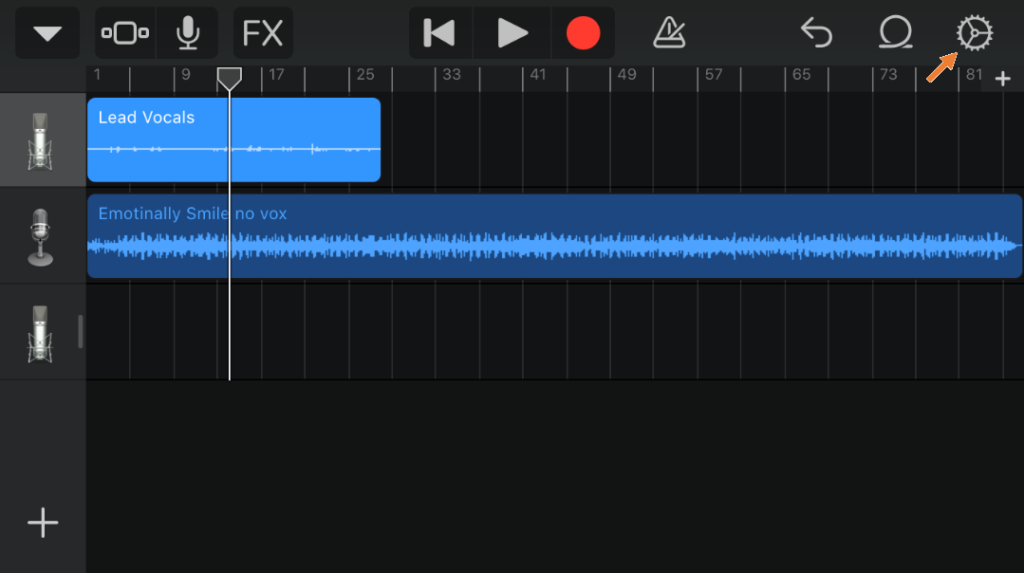
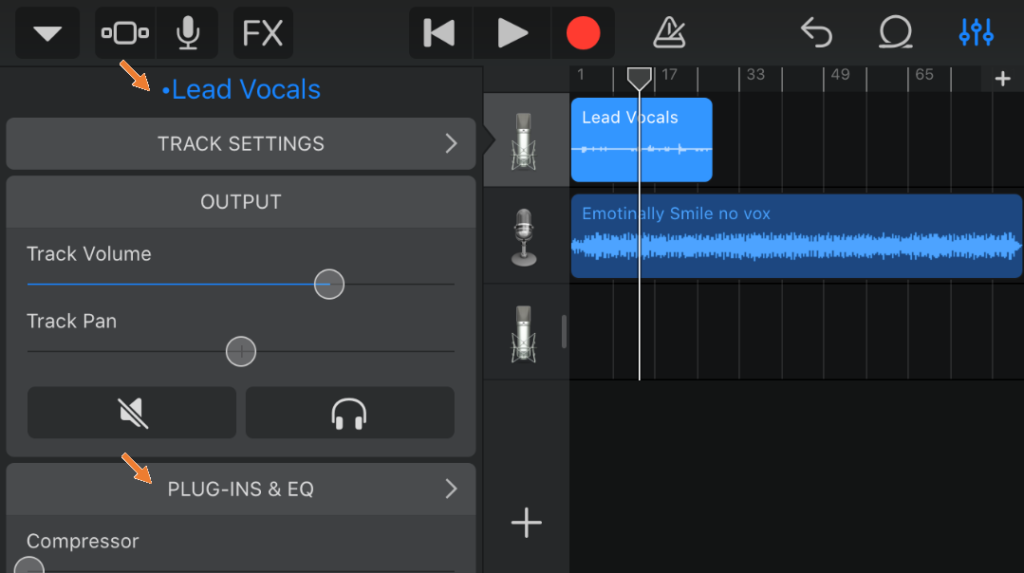
2. Choose Track Controls

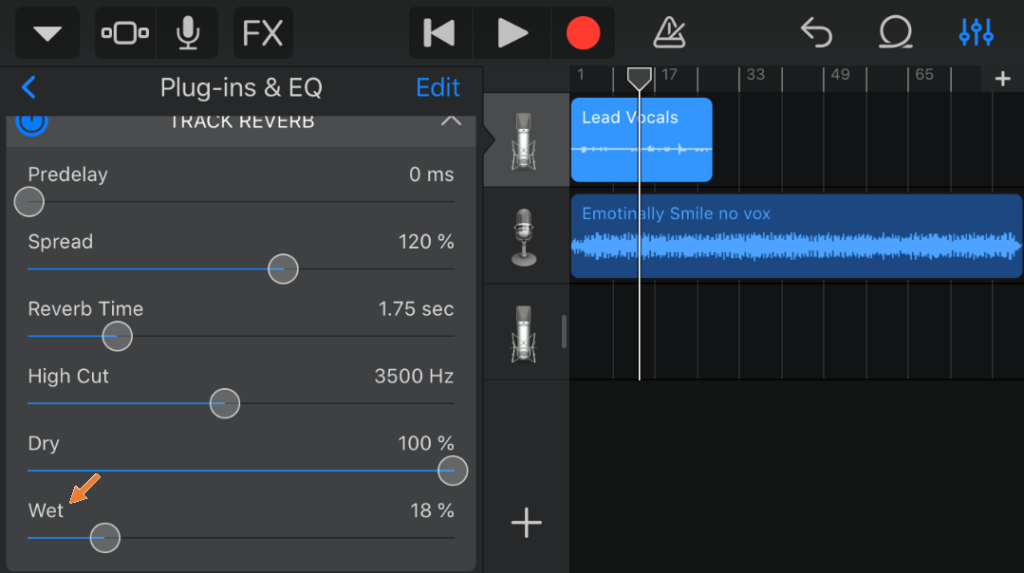
3. Make sure that Lead Vocals is the preset. If not press the microphone symbol and change the preset to Lead Vocals. Press Plugins and eq
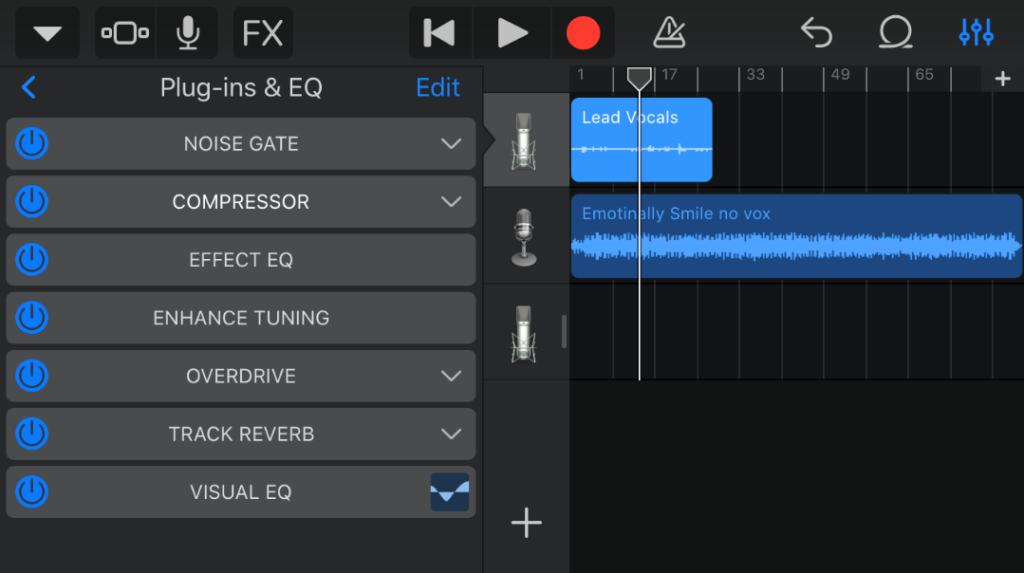
4. Uncheck everything except Compressor, Track reverb and visual eq. If your recording is noisy keep Noise gate checked. Playback the vocals both Solo and in the mix to decide the Noise gate threshold level.

5. Keep compressor as it is.
6. Press Track Reverb. Now you have to decide how much reverb you want by changing the wet level. Less reverb puts the sound close to the listener. More reverb puts the sound further away from the listener. I thinks the vocals should be close to the listener so I would pick less reverb but not zero. But this is a matter of taste. Playback the vocals both Solo and in the mix to decide the reverb level.
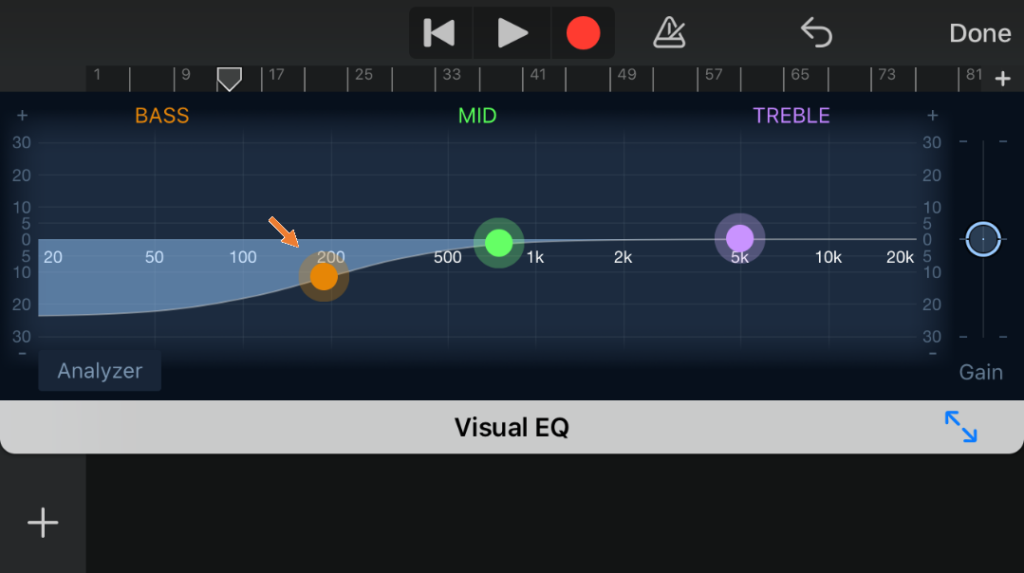
7. Press Visual EQ.
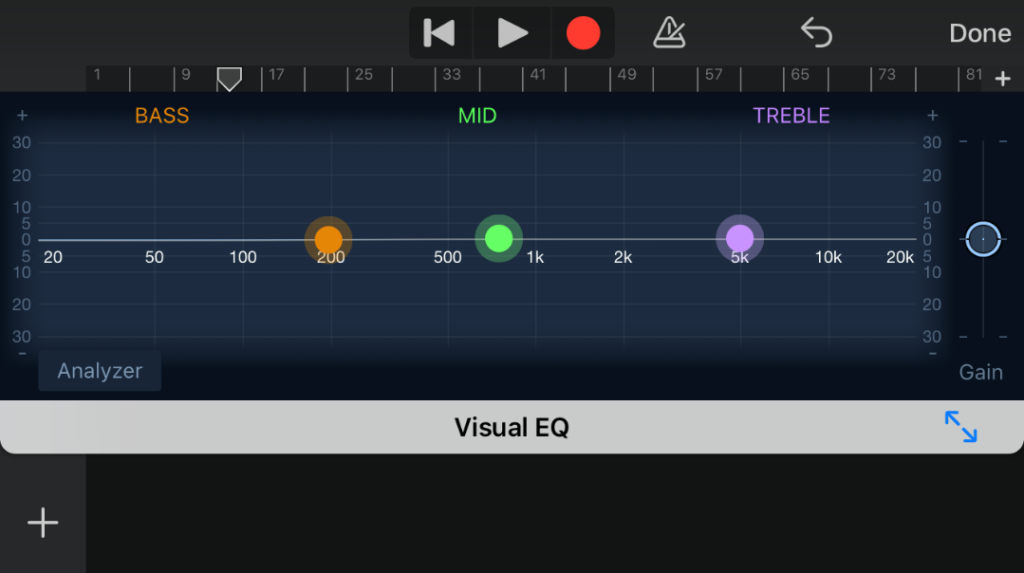
Drag the orange button at 200 down. This is your hi pass/low cut filter. It will make the noise in the lower region disappear and make room for your vocals in higher frequencies.
Android: BandLab
On your Android phone use Bandlab. It has a lot of presets so you don’t have to be a mix engineer to record and mix professional vocals. See my tutorial on Bandlab describing how to record the vocals with the Bandlab app.
For editing the vocals do the following:
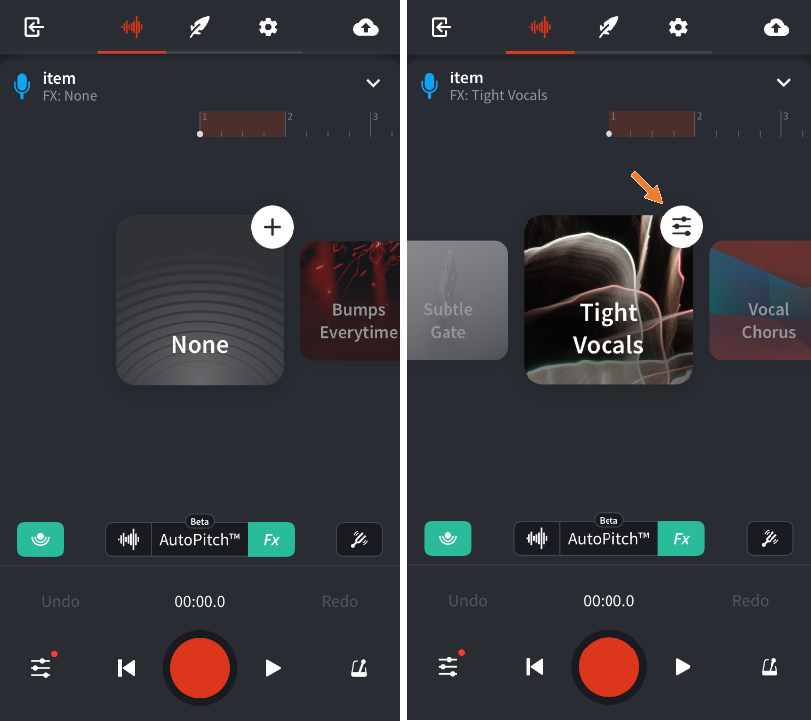
- Double press the Microphone symbol of your vocal track
2. Press the FX button
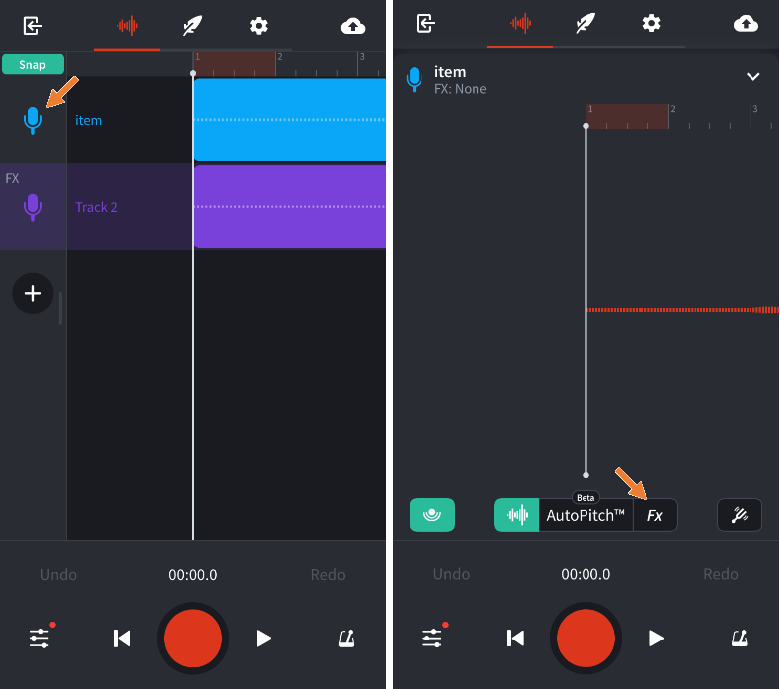
3. Scroll right and choose Tight vocals
4. Press the white settings button
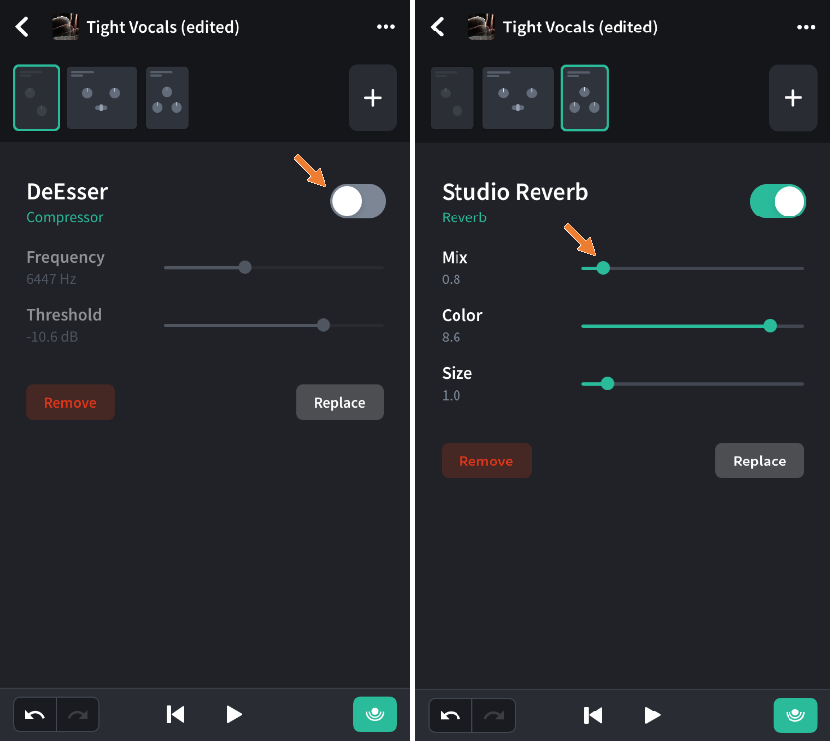
5. Uncheck deEsser unless you feel there are problems with s and other consonants like p, t and k.
6. Keep compressor as it is.
7. Press Studio reverb. Now you have to decide how much reverb you want by changing the mix level. Less reverb puts the sound close to the listener. More reverb puts the sound further away from the listener. I thinks the vocals should be close to the listener so I would pick less reverb but not zero. But this is a matter of taste. Playback the vocals both Solo and in the mix to decide the reverb level.
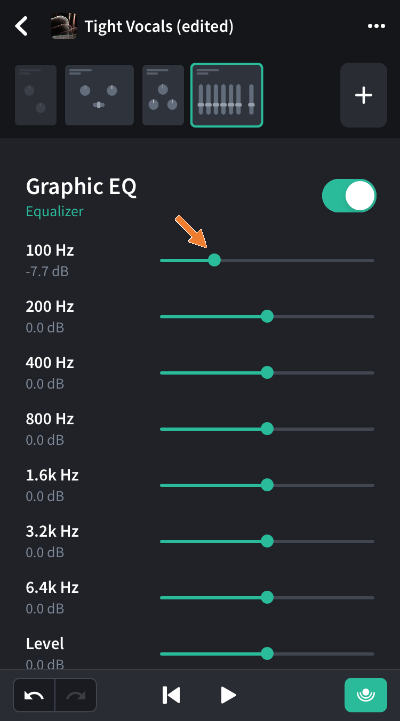
8. Press the + sign and choose Graphic EQ
9. Move the 100 Hz leveler half way to the left. This is your hi pass/low cut filter. It will make the noise in the lower region disappear and make room for your vocals in higher frequencies.

10. “Autotune”. Press the AutoPitch button. Choose Light, Medium or Heavy. Use light if you don’t want to sound like a robot. Playback the vocals both Solo and in the mix to decide the AutoPitch level.
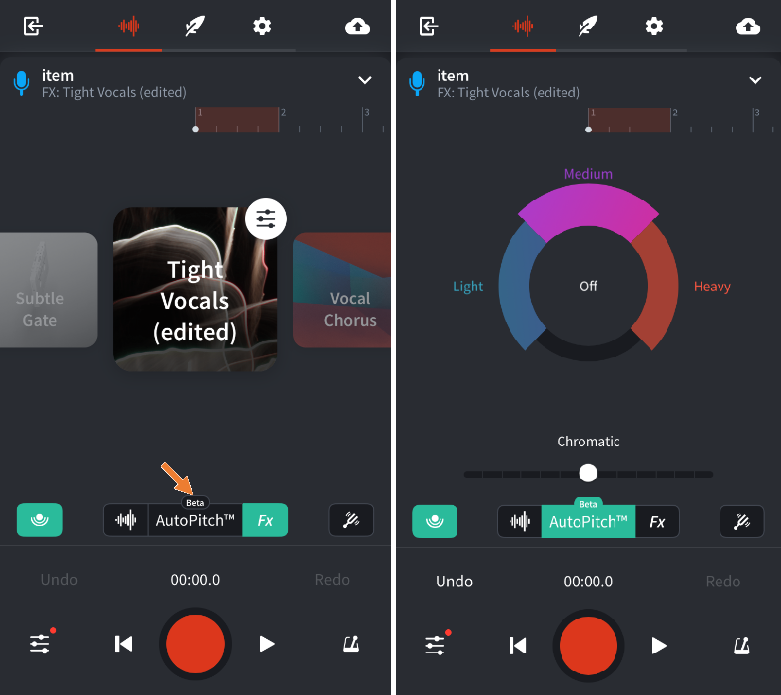
11. If your recording is noisy: Press + button and choose the Dynamics group. Choose Noice gate. Set the threshold so you only remove the noise and not your vocals. Playback the vocals both Solo and in the mix to decide the threshold level.
Advanced option: Cubase
In this section I will describe Cubase that runs on Mac or Windows. There’s a bunch of other DAW:s out there in different price ranges but most of them work the same way.
When you set the different effects described below playback the vocals both Solo and in the mix to decide each effect level.
Comping
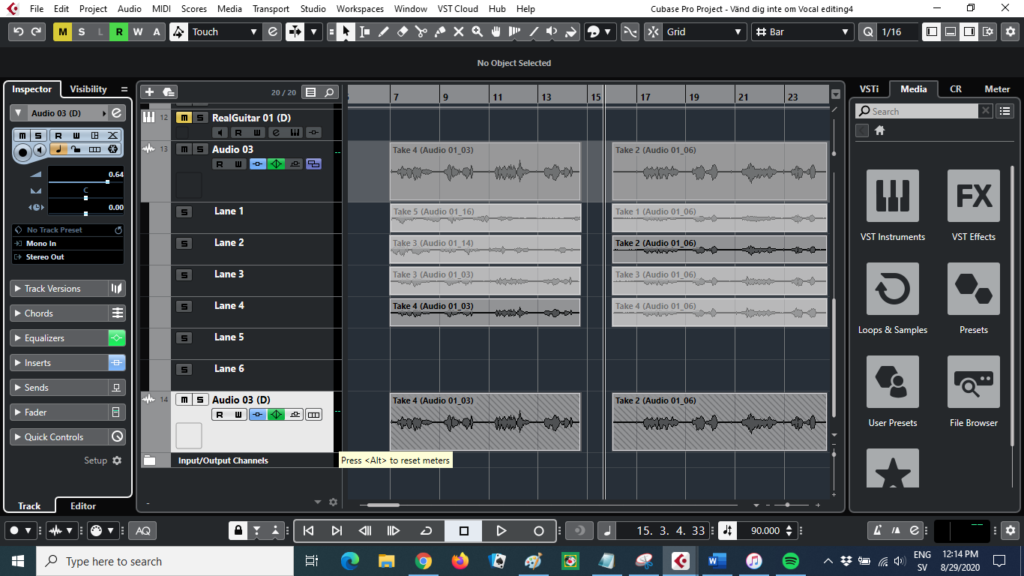
Comping is the process where you compile your recording by choosing the best parts of your different takes. You can also cut out unwanted noise and change the volume on parts that are too low or too high in volume level. Start Comping by removing silent parts before and after each phrase. Heavy breathing and noise might be in these parts. Attach a short fade in and fade out on all parts. Continue with identifying the best take for each part. Change volume where its too low or too high.
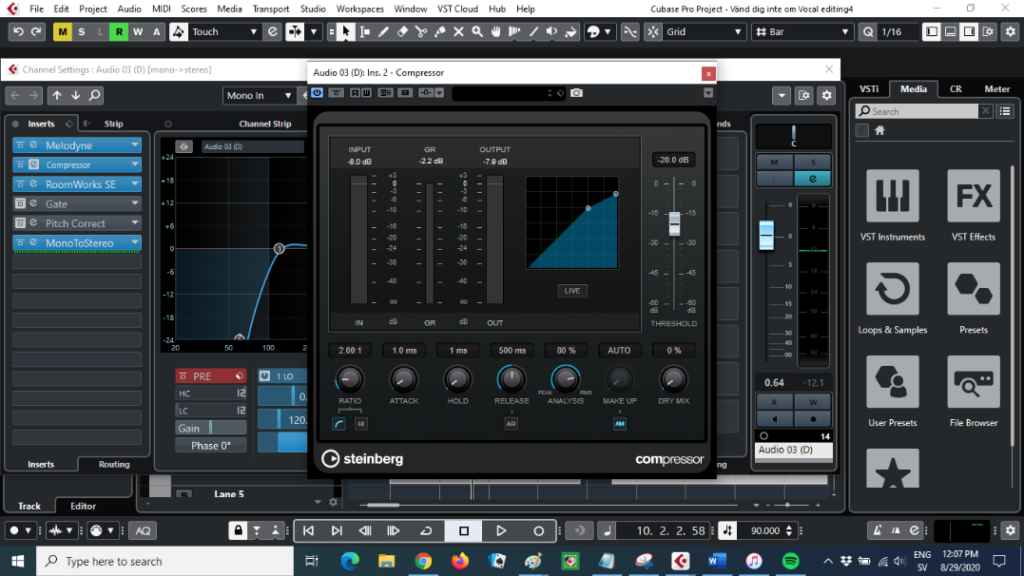
Compressor
The compressor fixes uneven volume levels. The compressor raises areas with too low volume and lowers areas with too high volume.
EQ
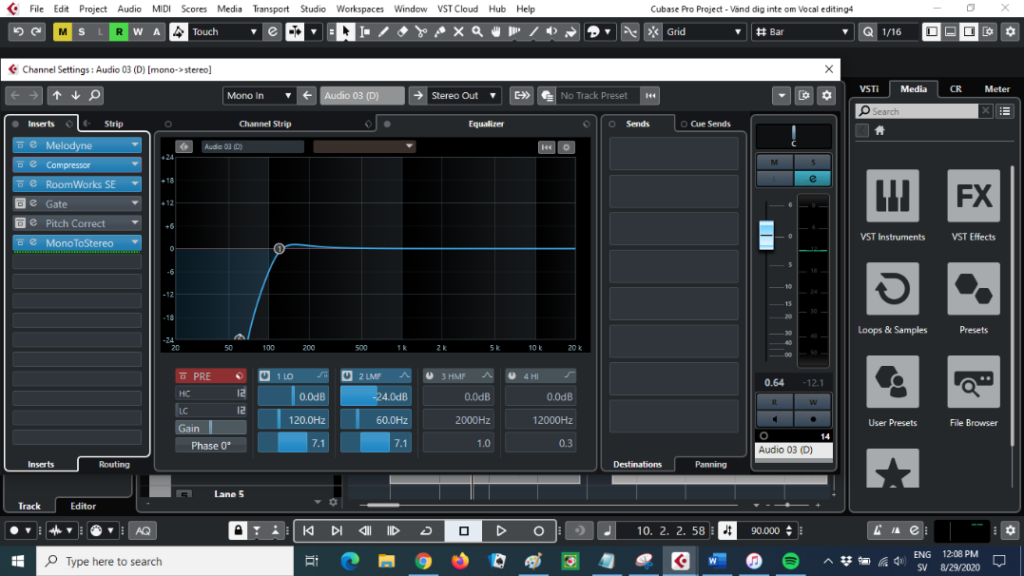
EQ filters the frequencies. It makes room for all instruments in the mix and filters away noise in unwanted frequencies.
When several instruments are loud in the same frequency, they compete and kill each other.
Vocals should be filtered in lower frequencies and raised in higher. A low cut/high pass filer is used. The filtered frequencies for female vocals are under 120 Hz and for male vocals under 90 Hz.
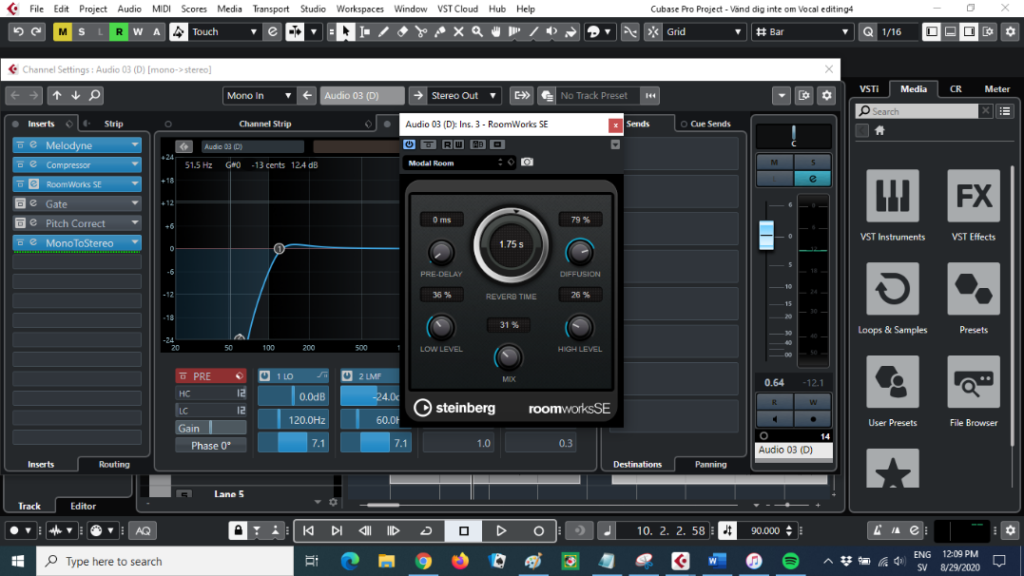
Reverb/Delay
The reverb places the singer or instrument in a room. Less reverb puts the sound close to the listener. More reverb puts the sound further away from the listener. I thinks the vocals should be close to the listener so I would pick less reverb but not zero. For many reverb effects there are presets named after different rooms like closet, kitchen, living room, church and arena. For a larger room the distance to the singer increases. But this is a matter of taste. In some genres lots a reverb is used but in others less. The reverb can also be used harder or to create special effects on certain parts of the song. Playback the vocals both Solo and in the mix to decide the reverb level.
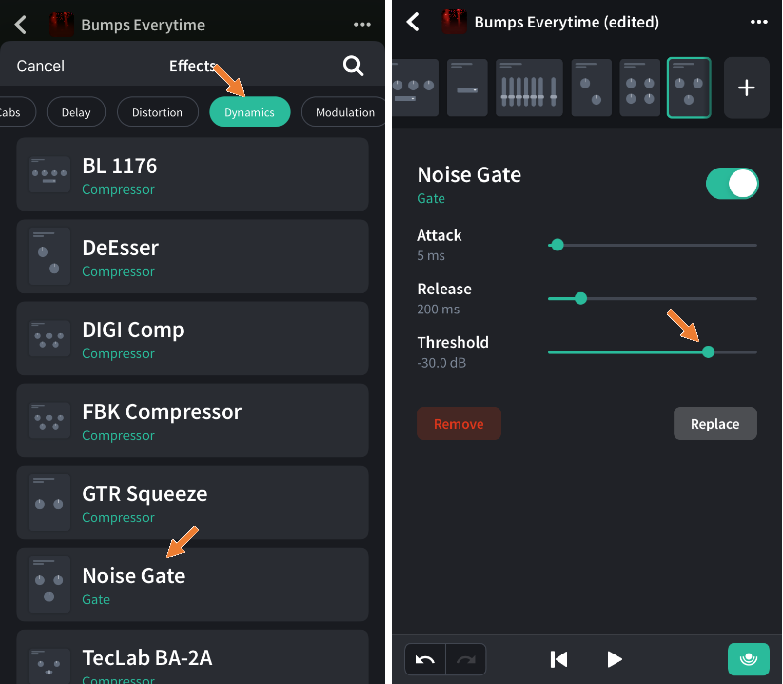
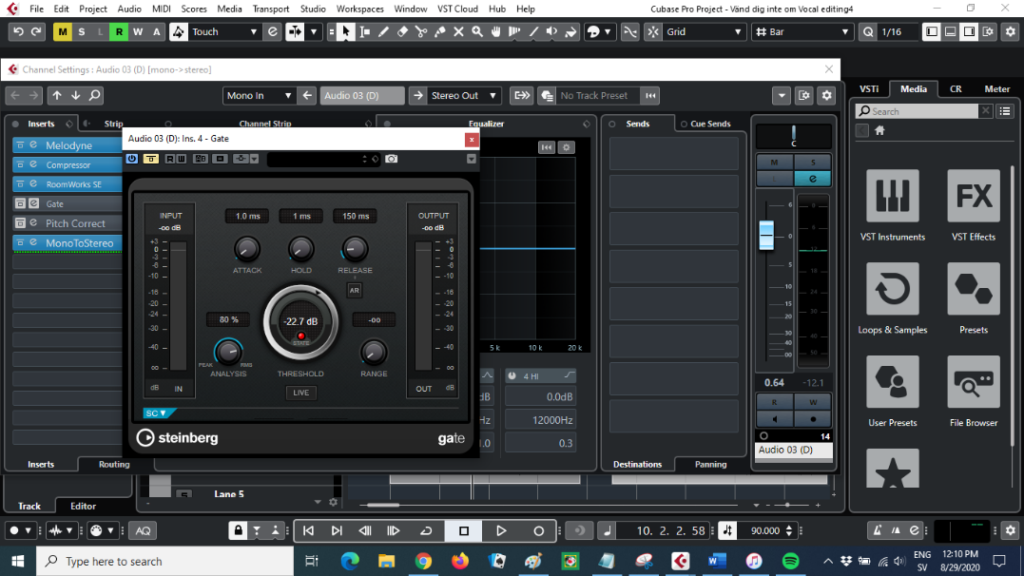
Gate
Noise gate is a filter to remove unwanted noise. However its much better to do the vocals without noise then to try to fix it in post production. The threshold determines how loud noise that will be filtered away. A too high threshold will also clip lower parts of the vocals. Playback the vocals both Solo and in the mix to decide the threshold level.
DeEsser
The deEsser removes unwanted s-sounds and pop sounds like p, k and t. Like the noise gate it’s better to remove it while recording by using a pop killer rather then fixing it in post production. A pop killer is a small device with a net attached to the mic. An other trick is to hold a pen in front of the mic or sing in an angel instead of the straight into the mic.
Saturation
Saturation is used to make soft vocals sound more intense. Modern singing technics involves low intense singing and whispering which will make the vocals sound relaxed. Saturation can be used to intensify some parts so the singer doesn’t have to scream.
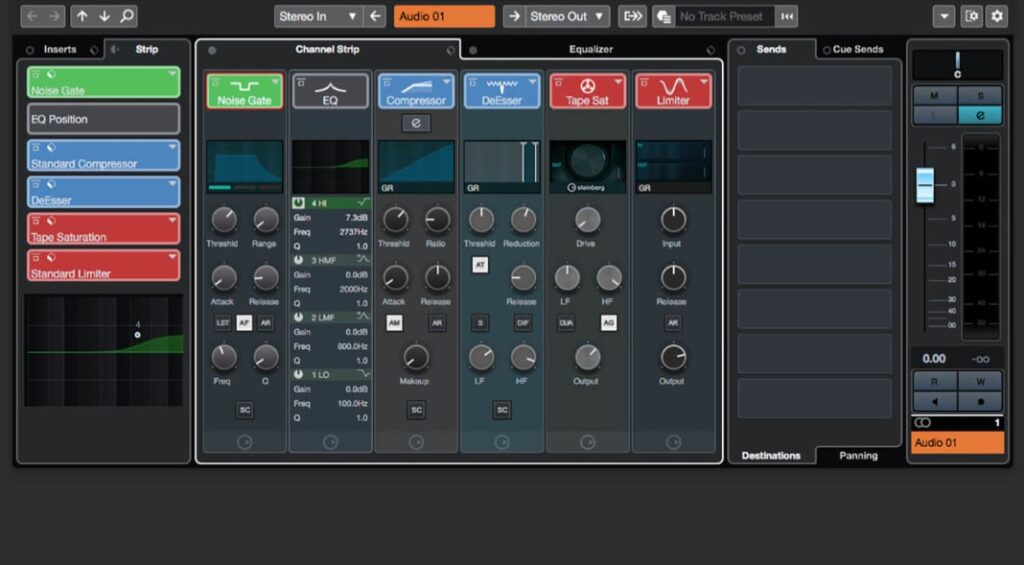
Choose Channel Strip. DeEsser and Tape Saturation
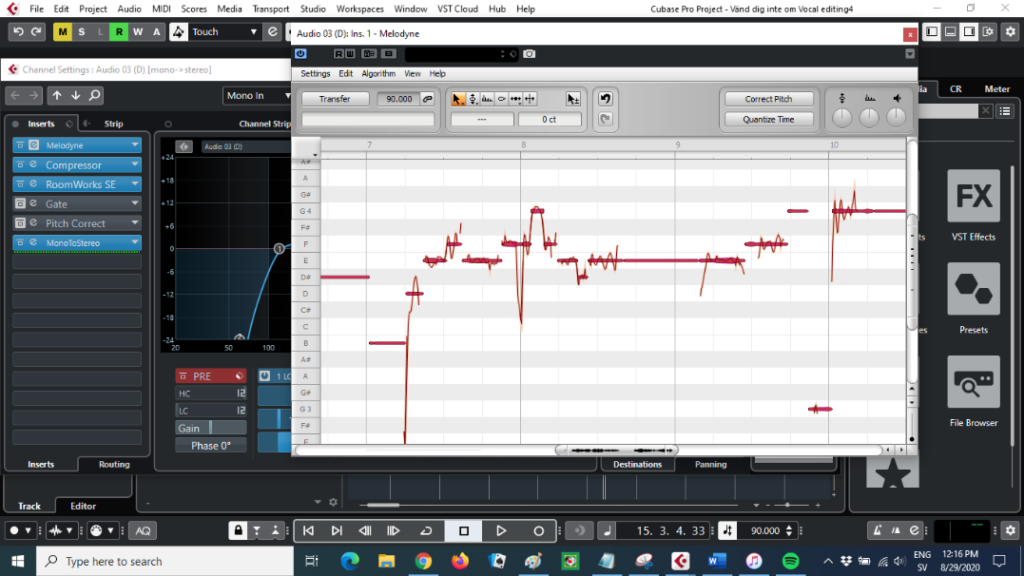
Auto-tune/Melodyne
Pitch control like Auto-tune or Melodyne has a bad reputation as being cheating. Too heavy pitch control also makes the singer sound like a robot. The truth is that it’s used frequently even on vocals that doesn’t sound pitched at all. Pitch control helps vocals nearly on pitch to be an pitch and it can also be used to create stems and harmonies to widen the sound.
The pitch control changes the pitch of each note but also the drift. Autotune and Melodyne can also be used to change the timing and length of each note.
Open Melodyne and place Melodyne on top of the fx chain. Press Transfer to transfer the vocals. Play the complete track and stop playback. Melodyne will import the track.
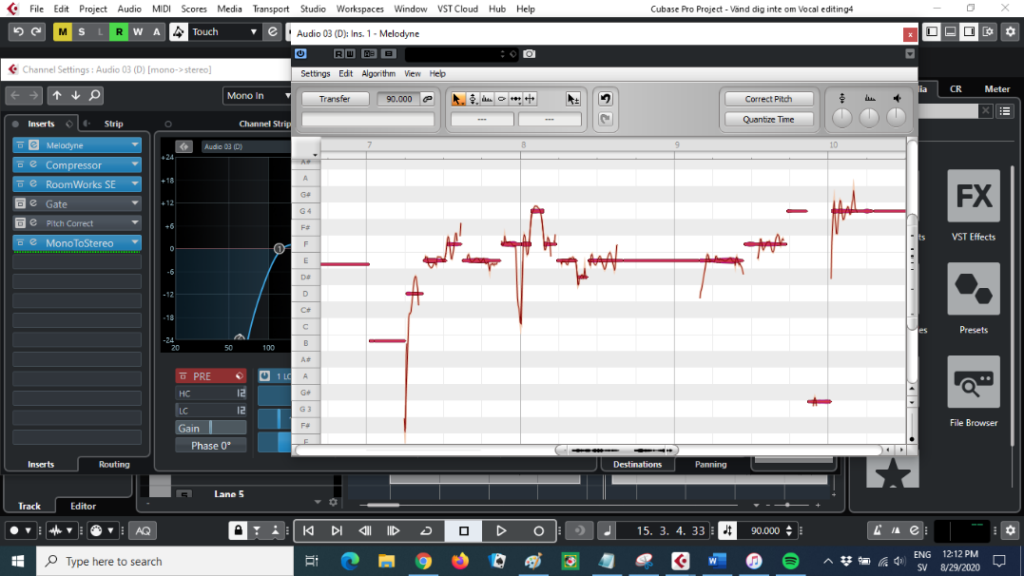
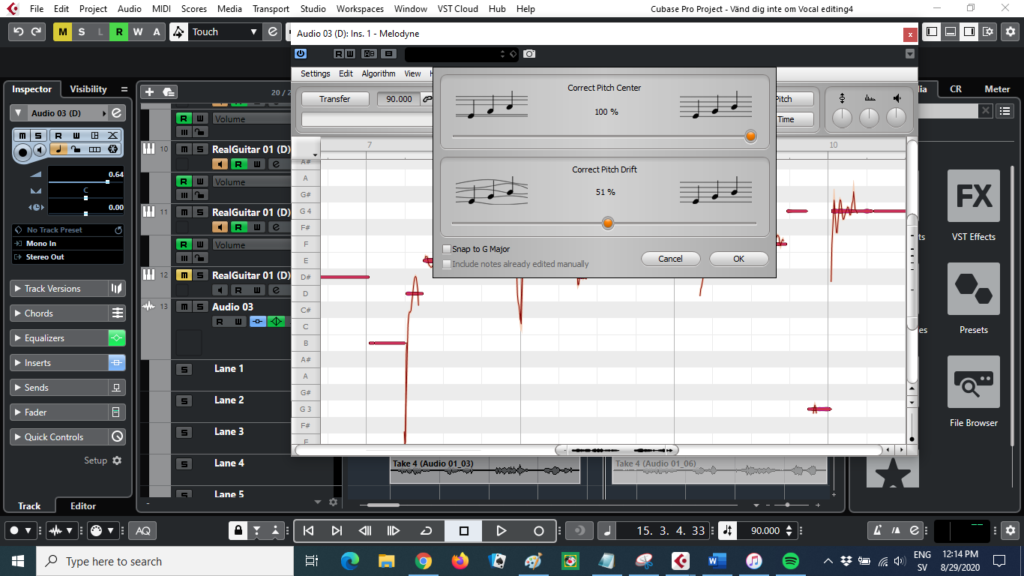
Select all notes (Ctrl-A) and press pitch control.
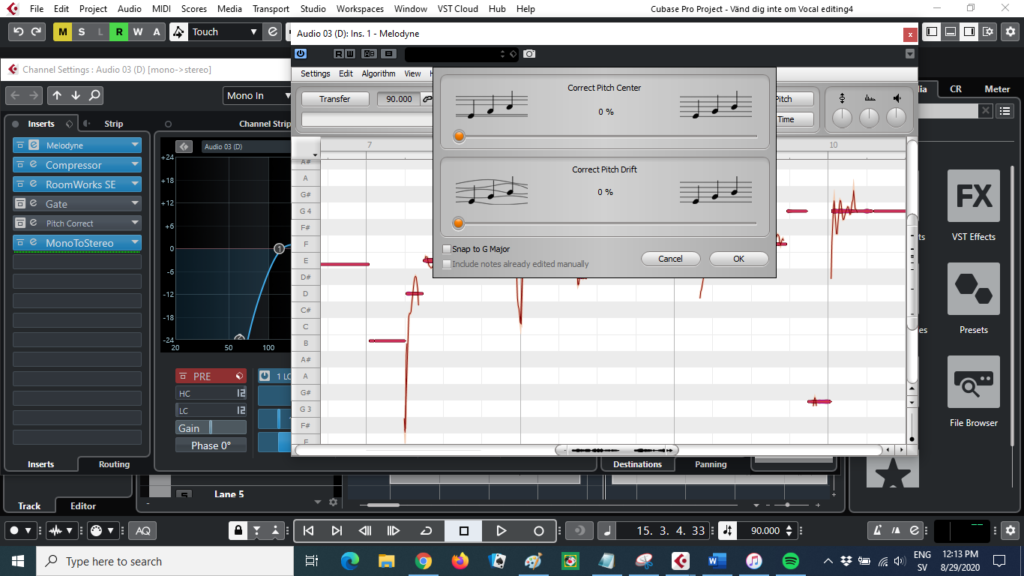
Choose 100% Correct pitch center.
Choose 50% Correct pitch drift.
Observe how the notes line up in the center of each line.
Play the complete track both solo and in te mix and check that no note has been corrected incorrectly. If your unpitched note is closer to another note then the correct one; then it will be corrected to that one instead. If you find any incorrect notes; change them manually by dragging it the with the manual pitch tool.
Panning
EQ and reverb place the different instruments on different places on the stage and makes room for them all. Panning left and right is also used for the same reason. In the early days of stereo one instrument was panned hard to the left and another one hard to the right. This will sound weird in when listening with headphones. Later; softer panning appeared but today instruments are often panned left AND right but with different % for each instrument. However lead vocals and bass are usually panned in the center.
Stems and harmonies
Stems usually use the same notes as the lead and harmonies use other notes in the chord. Stems and harmonies can be used in the obvious way to make the song sound like if it is sung by a choir. They can also be used to make the vocal sound wide since the lead is often panned dead center. Both stems and harmonies can be recorded separately but they can also be created by cloning the lead vocals.
Make a copy of the lead vocals. Make sure you have done all comping and other modifications before you do this.
Change the reverb to a larger reverb.
Change the pitch control to another one then the one used on the lead vocals. Use a more pitch control if you have a little or no pitch control on the lead vocals. Use less pitch control if you have a lot of pitch control on the lead vocals.
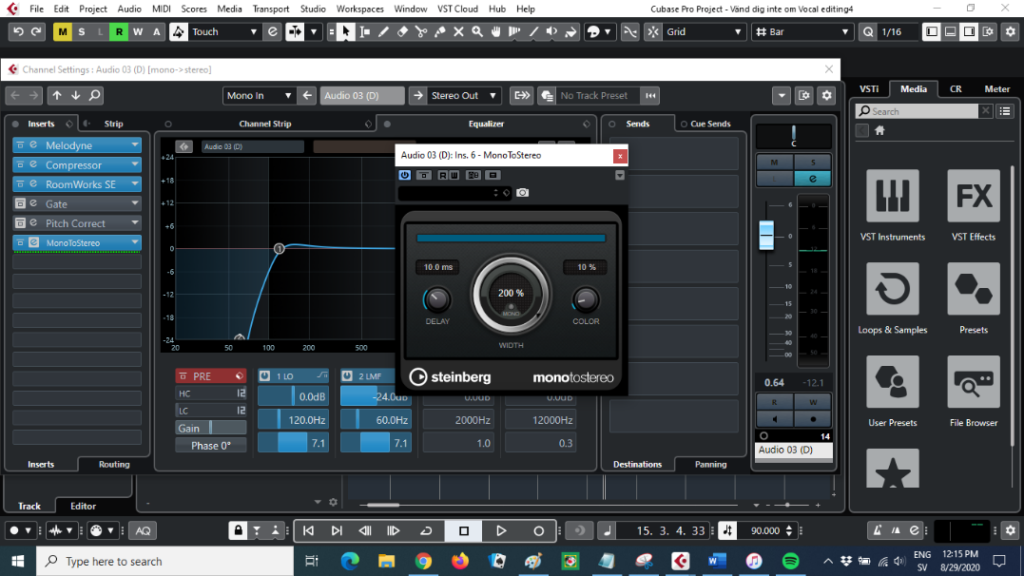
Add a mono-to-stereo effect or create two tracks, one panned right and one left. The % of left/right can be any number but it’s good to use different numbers if you use the effect on several instruments or vocals.
Set a pre delay of 10-20 ms on the track. If you have two tracks set a negative delay on one of the tracks.
These actions will make the stem sound different from the lead vocals.
When all effects are applied, lower the volume of the stem until you can’t hear it in the mix.
Create harmonies
Open Melodyne on the stem track or on a second copy of the stem with all stem effects applied.
Select all notes. (Ctrl-A). Move all notes 4 steps up. Listen to the complete track both solo, with the lead vocals and in the mix to determine which notes must be lowered or raised. Fix these notes manually. A tip is to start by only using notes that are in the key of the song. For instance, C major only has the notes C, D, E, F, G, A and B. They’re all white on the piano and in the Melodyne grid.